

Key Benefits of Ham and Cheese Hawaiian Roll Sliders
If you’re looking for a recipe that’s quick, easy, and guaranteed to impress, these Ham and Cheese Hawaiian Roll Sliders check all the boxes. Here’s why they’re a must-try:
- Perfect for Any Occasion: Whether it’s a game day, potluck, or casual family dinner, these sliders are a versatile dish that fits any event.
- Quick and Easy to Make: With just a handful of ingredients and minimal prep time, you can have these ready in under 30 minutes.
- Crowd-Pleasing Flavor: The combination of sweet Hawaiian rolls, savory ham, and melted cheese creates a flavor profile that everyone loves.
- Customizable: You can easily switch up the ingredients to suit your taste—try different cheeses, add toppings, or even swap the ham for turkey or roast beef.
- Make-Ahead Friendly: These sliders can be prepped in advance, making them a stress-free option for busy days or hosting events. [source]
Whether you’re a seasoned cook or a beginner in the kitchen, this recipe is approachable, foolproof, and guaranteed to deliver delicious results every time. Let’s get started!
Ingredients for Ham and Cheese Hawaiian Roll Sliders
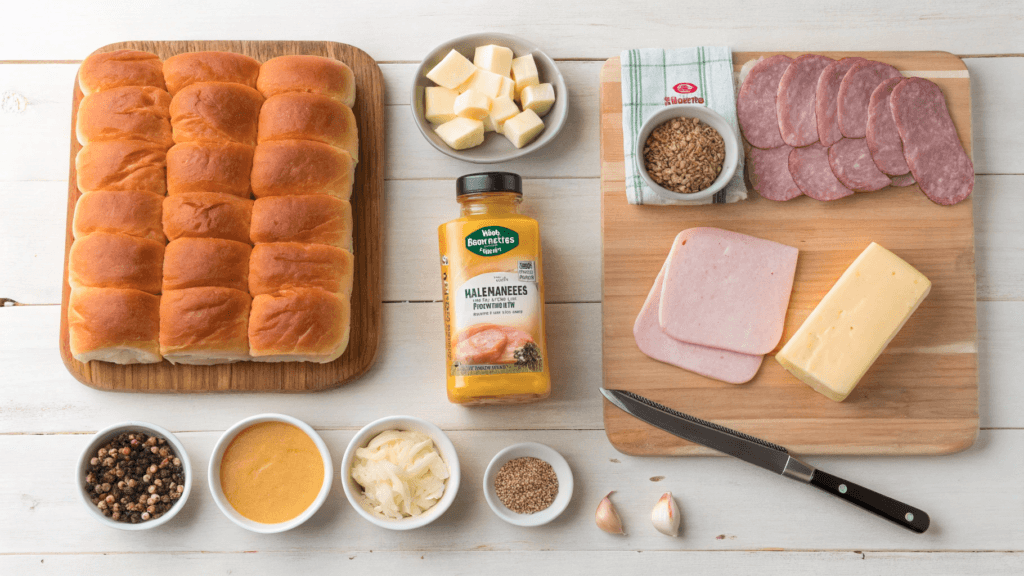
Gathering the right ingredients is the first step to creating these irresistible sliders. Don’t worry—everything on this list is simple, easy to find, and comes together beautifully. Here’s what you’ll need:
For the Sliders:
- 12 Hawaiian rolls: Their soft, slightly sweet flavor is the perfect base for these sliders.
- 12 slices of deli ham: Choose your favorite variety—honey ham, smoked ham, or even Black Forest ham all work well. [Advice]
- 6 slices of Swiss cheese: Cut them in half to fit the rolls perfectly. You can also use cheddar or provolone for a twist. [Guide]
For the Butter Sauce:
- 1/2 cup unsalted butter: Melted to create a rich, flavorful topping.
- 2 tablespoons Dijon mustard: Adds a tangy kick that balances the sweetness of the rolls.
- 1 tablespoon Worcestershire sauce: Enhances the savory flavors of the sliders.
- 1 tablespoon poppy seeds: Optional, but they add a nice crunch and visual appeal.
- 1/2 teaspoon garlic powder: For a subtle, savory depth.
- 1/2 teaspoon onion powder: Complements the garlic and adds a touch of sweetness.
Optional Add-Ons:
- Pickles or jalapeños: For a tangy or spicy twist.
- Honey or maple syrup: Drizzle a little over the ham for extra sweetness.
Having these ingredients prepped and ready will make the assembly process a breeze. Plus, the combination of sweet, savory, and tangy flavors ensures every bite is packed with deliciousness. Ready to start assembling? Let’s move on to the instructions!
Instructions for Making Ham and Cheese Hawaiian Roll Sliders
Making these Ham and Cheese Hawaiian Roll Sliders is as easy as it gets! Follow these step-by-step instructions, and you’ll have a tray of warm, cheesy goodness ready in no time.
Step 1: Preheat the Oven
- Preheat your oven to 350°F (175°C). This ensures the sliders bake evenly and the cheese melts perfectly.
Step 2: Prepare the Rolls
- Using a serrated knife, carefully slice the Hawaiian rolls in half horizontally, keeping the top and bottom halves intact.
- Place the bottom half of the rolls in a greased or parchment-lined 9×13-inch baking dish.
Step 3: Layer the Ham and Cheese
- Evenly cover the bottom half of the buns with the ham pieces.You can fold or overlap the slices to fit.
- Add a layer of Swiss cheese (or your preferred cheese) on top of the ham, ensuring full coverage for that gooey, melted goodness.
Step 4: Add the Top Layer
- Place the top half of the rolls back on top of the ham and cheese layers, aligning them neatly.
Step 5: Make the Butter Sauce
- In a small bowl, whisk together the melted butter, Dijon mustard, Worcestershire sauce, poppy seeds, garlic powder, and onion powder.
- Brush the tops of the rolls liberally with the butter mixture using a pastry brush. To get the most taste, make careful to coat every inch.
Step 6: Bake the Sliders
- To stop the tops from browning too soon, cover the baking dish with aluminum foil.
- After 15 minutes of baking in a preheated oven, take off the foil and continue baking for another 5 to 7 minutes, or until the cheese is completely melted and the tops are golden brown.
Step 7: Serve and Enjoy
- After taking the sliders out of the oven, let them a minute or two to cool.
- Use a sharp knife to cut the sliders into individual portions, and serve them warm.
These sliders are best enjoyed fresh out of the oven, but they’re just as delicious reheated later. They will go quickly whether you’re serving them for a gathering or a quick family dinner. Ready for some pro tips? Let’s take your sliders to the next level!
Pro Tips and Variations for Perfect Ham and Cheese Hawaiian Roll Sliders
Want to take your Ham and Cheese Hawaiian Roll Sliders to the next level? These pro tips and creative variations will help you customize the recipe and ensure flawless results every time.
Pro Tips for Success:
- Keep the Rolls Intact: When slicing the rolls, don’t separate them into individual pieces. Keeping them connected makes assembly easier and ensures even baking.
- Use Fresh Ingredients: Opt for high-quality deli ham and cheese for the best flavor. Fresh Hawaiian rolls also make a big difference in texture and taste.
- Brush Generously: Don’t skimp on the butter sauce! It’s the secret to those golden, flavorful tops and adds a rich, savory touch to every bite.
- Cover While Baking: Covering the sliders with foil for the first part of baking prevents the tops from browning too quickly while allowing the cheese to melt evenly.
- Let Them Rest: After baking, let the sliders sit for a minute or two before cutting. This helps the cheese set slightly, making them easier to serve.
Creative Variations to Try:
- Switch Up the Cheese: While Swiss cheese is classic, you can experiment with cheddar, provolone, or even pepper jack for a spicy kick.
- Add a Sweet Touch: Drizzle a little honey or maple syrup over the ham before adding the cheese for a sweet-and-savory twist.
- Go Spicy: Add a layer of sliced jalapeños or a sprinkle of crushed red pepper flakes for some heat.
- Try Different Meats: Swap the ham for turkey, roast beef, or even crispy bacon to change up the flavor profile.
- Make It Vegetarian: Skip the meat and load up on sautéed mushrooms, spinach, or roasted red peppers for a veggie-friendly version.
- Gluten-Free Option: Use gluten-free rolls to make this recipe suitable for those with dietary restrictions.
Make-Ahead and Storage Tips:
- Prep Ahead: Assemble the sliders up to a day in advance, cover them tightly, and refrigerate. When ready to bake, simply brush on the butter sauce and pop them in the oven.
- Reheating: Warm leftover sliders in the oven at 300°F for 10-12 minutes to keep them soft and melty. Avoid microwaving, as it can make the rolls soggy.
- Freezing: Wrap assembled (but unbaked) sliders tightly in foil and freeze for up to 1 month. Before baking as instructed, let it thaw overnight in the refrigerator.
With these tips and variations, you can customize your sliders to suit any occasion or craving. Ready to serve them up? Let’s explore some delicious pairing ideas next!
Serving Suggestions for Ham and Cheese Hawaiian Roll Sliders
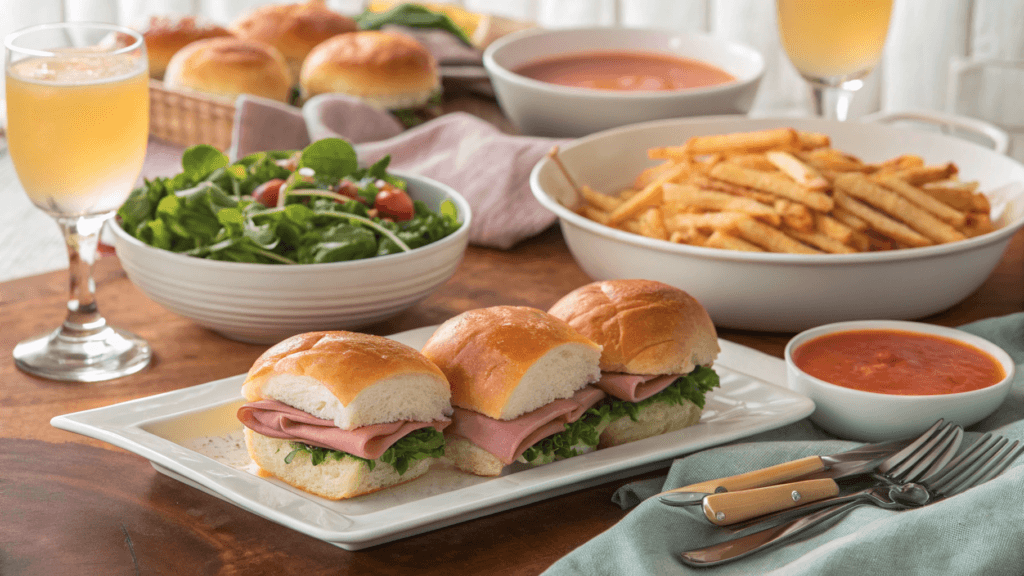
These Ham and Cheese Hawaiian Roll Sliders are incredibly versatile and pair beautifully with a variety of sides and drinks. Whether you’re hosting a party or enjoying a cozy family meal, here are some serving ideas to make your sliders even more satisfying:
Perfect Pairings:
- Soups: Serve these sliders alongside a warm bowl of tomato soup, creamy potato soup, or broccoli cheddar soup for a comforting meal.
- Salads: Pair them with a fresh green salad, Caesar salad, or a tangy coleslaw to balance the richness of the sliders.
- Chips and Dips: Add a side of potato chips, tortilla chips, or veggie sticks with dips like ranch, guacamole, or spinach artichoke dip for a fun, snackable spread.
- Fries: Crispy French fries, sweet potato fries, or even tater tots make a classic and crowd-pleasing side.
- Pickles and Relishes: A side of dill pickles, bread-and-butter pickles, or a tangy relish adds a refreshing contrast to the sliders’ savory flavors.
Drinks to Serve:
- For Adults: Pair with a crisp white wine, a light beer, or a refreshing cocktail like a mojito or sangria.
- For Kids: Serve with lemonade, fruit punch, or a fizzy soda for a fun and family-friendly option.
Great for Any Occasion:
- Game Day: These sliders are a hit at any game day party. Serve them with nachos, wings, and a variety of dipping sauces for the ultimate snack table.
- Potlucks and Parties: Arrange the sliders on a platter with toothpicks for easy serving. Add a side of pasta salad or baked beans to round out the meal.
- Quick Family Dinners: Pair with a simple side salad or roasted veggies for a no-fuss, satisfying dinner that everyone will love.
No matter how you serve them, these sliders are guaranteed to be the star of the table. Their sweet, savory, and cheesy flavors make them a versatile dish that works for any occasion. Ready to wrap things up? Let’s move on to the conclusion!
Conclusion

There you have it—your ultimate guide to making Ham and Cheese Hawaiian Roll Sliders! These sliders are the perfect combination of sweet, savory, and cheesy goodness, making them a go-to recipe for any occasion. Whether you’re hosting a party, preparing a quick family dinner, or looking for a crowd-pleasing dish for game day, these sliders are guaranteed to impress.
This recipe’s adaptability is what elevates it even more. You can customize the ingredients, prepare them ahead of time, and pair them with your favorite sides to create a meal that’s uniquely yours. Plus, the simple steps and minimal prep time mean you’ll spend less time in the kitchen and more time enjoying the company of your loved ones.
So, what are you waiting for? Grab your ingredients, preheat that oven, and get ready to serve up a dish that’s sure to disappear in minutes. Once you try these sliders, they’ll quickly become a staple in your recipe collection. Happy cooking, and enjoy every delicious bite!
If you have any questions or want to share your own creative variations, feel free to leave a comment—I’d love to hear from you! 😊
FAQs About Ham and Cheese Hawaiian Roll Sliders
Got questions about making these delicious sliders? Here are some of the most common inquiries to help you perfect this recipe and troubleshoot any concerns.
Is it possible to create these sliders in advance?
Absolutely! You can assemble the sliders (without brushing on the butter sauce) up to a day in advance. Store them in the refrigerator after covering them tightly with plastic wrap. Apply the butter sauce and place them in the oven when you’re ready to bake.
2. How do I store leftover sliders?
If you have leftovers (though it’s rare!), store them in an airtight container in the refrigerator for up to 3 days. To keep the buns soft and the cheese melted, reheat them in the oven for 10 to 12 minutes at 300°F.
3. Can I freeze these sliders?
Yes! Don’t bake the sliders; just put them together to freeze. Put them in a freezer-safe bag after securely wrapping them with aluminum foil. They’ll keep for up to 1 month.Thaw them overnight in the fridge before baking, then brush with the butter sauce and bake according to the recipe.
4. What can I use instead of ham?
Feel free to get creative! You can use roast beef, turkey, or even crispy bacon in place of the ham. For a vegetarian option, try roasted vegetables like mushrooms, bell peppers, or spinach.
5. How can I keep the sliders from becoming wet?
To avoid soggy sliders, make sure to use a light hand with any wet ingredients like sauces or pickles. If you’re making them ahead, wait to brush on the butter sauce until just before baking.
6. Can I use a different type of roll?
While Hawaiian rolls are the classic choice for their sweetness and softness, you can use any slider-sized rolls or even mini brioche buns. Simply ensure that they are tender and simple to cut.
7. What’s the best way to reheat sliders?
The oven is your best friend for reheating sliders. Steer clear of the microwave as it may cause the rolls to become mushy. Alternatively, cover the sliders with foil and reheat them for 10 to 12 minutes at 300°F.
8. Can I customize the butter sauce?
Of course! The butter sauce is super versatile. Add a pinch of Italian seasoning, a dash of hot sauce, or even a sprinkle of Parmesan cheese to make it your own.
Please feel free to leave a comment below if you have any more queries or advice. How you customize these sliders is something I’d really like to hear! 😊